Mithilfe des Karplus-Strong-Algorithmus lässt sich die Schwingung einer Saite simulieren. Dazu wird ein Ringbuffer wie in Aufgabe 1 benötigt, der in einer Java-Klasse implementiert werden soll. In diesem werden Auslenkungen der Saite gespeichert. Eine Saite benutzt diesen Ringbuffer, indem sie darauf den Karplus-Strong-Algorithmus anwendet. Dafür wird ein Ringbuffer mit einer Länge N verwendet, die der Grundfrequenz der Saite entspricht, wobei N der Quotient aus Samplingrate (44100) und Frequenz des Grundtons ist, auf die nächste ganze Zahl gerundet.
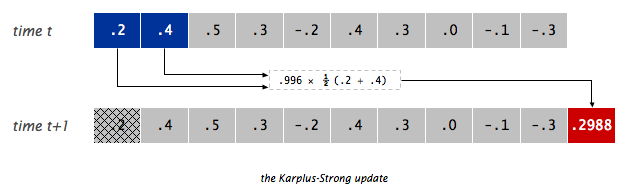
Beim Anschlagen der Saite wird der Ringbuffer mit weißem Rauschen gefüllt, so dass jedes Element des Ringbuffers ein Zufallswert zwischen -1/2 und 1/2 ist.

Der Algorithmus löscht in jedem Schritt das erste Element des Buffers und hängt das arithmetisches Mittel dieses Elements mit des darauf folgenden an das Ende des Buffers an, nachdem es mit dem Faktor 0.996 multipliziert wurde, der den Energieverlust darstellt.
Die Klasse Guitar soll wiederum 6 Instanzen der Klasse GuitarString verwenden, um eine Gitarre zu simulieren. Um die Frequenzen der Saiten zu bestimmen, wählt man den Kammerton A als Referenz. Dieser hat eine Frequenz von 440 Hertz. Damit die Saite eine Oktave höher oder tiefer schwingt, muss man diese Frequenz verdoppeln bzw. halbieren. Da eine Oktave 12 Halbtonstufen umfasst, muss man die Frequenz des Kammertons A für jeden Halbton, den man die Saite tiefer stimmen will, die Frequenz 440 Hertz durch die zwölfte Wurzel aus 2 teilen. Die hohe E-Saite der Gitarre liegt beispielsweise 5 Halbtöne unter dem Kammerton A, daher bestimmt man die Frequenz wie folgt:
frequency = 440.0 * Math.pow(2.0, -5.0 / 12.0);
Alternativ findet man die Frequenzen und weitere Informationen zur Stimmung der Gitarre hier:
http://en.wikipedia.org/wiki/Guitar#Standard
Ihre Lösungen bis hierhin können Sie mithilfe einer Klasse testen, die Ihnen erlaubt, mit Ihrer Tastatur Bünde zu drücken und Saiten anzuschlagen.
Aufgabe 1: RingBuffer. Your first task is to create a data type to model the buffer. Write a class named RingBuffer that implements the following API.
        RingBuffer(int capacity)  // constructor to create an empty buffer, with given max capacity
    int size()                    // return number of items currently in the buffer
boolean isEmpty()                 // is the buffer empty (size equals zero)?
boolean isFull()                  // is the buffer full  (size equals capacity)?
   void enqueue(double x)         // add item x to the end
 double dequeue()                 // delete and return item from the front
 double peek()                    // return (but do not delete) item from the front
Since the buffer has a known maximum capacity, you can implement a RingBuffer using a double array of that length. For efficiency, use cyclic wrap-around: Maintain one integer instance variable first that stores the index of the least recently inserted item; maintain a second integer instance variable last that stores the index one beyond the most recently inserted item. To insert an item, put it at index last and increment last. To remove an item, take it from index first and increment first. When either index equals capacity, make it wrap-around by changing the index to 0. 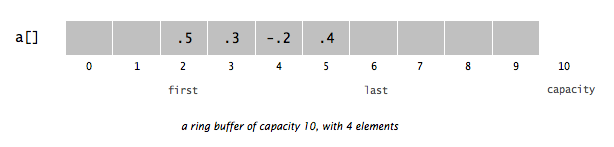
Aufgabe 2: GuitarString. Next, write a data type to model a vibrating guitar string of a given frequency. Implement a class named GuitarString with the following API.
       GuitarString(double frequency)
  void pluck()                         // set the buffer to white noise
  void mute()                          // fill the buffer with zeros
  void pressFretDown(int fret)         // change the length of the buffer according to the number of frets
  void tic()                           // advance the simulation one time step
double sample()                        // return the current sample
   int time()                          // return number of tics
- Constructor. Create a RingBuffer of the desired capacity N (sampling rate divided by frequency, rounded to the nearest integer), and initialize it to represent a string at rest by enqueueing N zeros.
- Pluck. Replace the N elements in the buffer with N random values between -0.5 and +0.5.
- Mute. Replace the N elements in the buffer with zeros.
- PressFretDown. Change the buffer length as if the string frequency would have changed, saving the frequency of the open string. newFrequency = openStringFrequency * Math.pow(2.0, fret / 12.0);
- Tic. Apply the Karplus-Strong update: delete the sample at the front of the buffer and add to the end of the buffer the average of the first two samples, multiplied by the energy decay factor.
- Sample. Return the value of the item at the front of the buffer.
- Time. Return the total number of times tic() was called.
Aufgabe 3: Guitar. Now use your GuitarString to build a guitar. This is mainly a wrapper for the methods of your strings.
       Guitar()
  void void pluckString(int string)                // pluck the corresponding string
  void mute()                                      // mute every string
  void pressFretDown(int string, int fret)         // press a fret on a string down
  void tic()                                       // advance the simulation one every string
double sample()                                    // compute a sample of the guitar output
- Constructor. Tune every string to its correct frequency.
- Pluck. Call pluck() on a GuitarString object.
- Mute. Call mute() on every GuitarString object.
- PressFretDown. Call pressFretDown(fret) on a GuitarString object.
- Tic. Call tic() on every string.
- Sample. By the superposition principle, you can get a sample of your guitar by adding the samples of all strings
Aufgabe 4: Test. Use the following classes to test your class Guitar:
